if(!require("usethis")) install.packages("usethis")
usethis::create_github_token()STA 9750 Mini-Project #00: Course Set-Up
In lieu of traditional homework, this course has a set of four mini-projects, which will be assessed in two stages. In the first, you will complete a small data analysis project1; after submission of your analysis, it will be assigned to a classmate, who will evaluate it according to an instructor-provided rubric. This peer feedback stage is an opportunity to see how your classmates answered questions and to compare it to your own response. In doing so, you will learn to evaluate data science work product and will develop a critical eye that can be turned to your own work.
This mini-project, however, is a meta-mini-project, designed to help you set up the course infrastructure you will use for the four graded mini-projects.
NB: Mini-Project #00 is not graded, but it is required. Without completing the activities described in this section, you will not be able to submit later (graded) mini-projects, so don’t skip this!
Note that this project is designed to try to have you encounter as many potential issues as possible. It is better to solve these issues now (early in the semester, without a grade on the line) than later with deadlines fast approaching. “Fail fast” is good advice in programming and in life in general.
\[\newcommand{\P}{\mathbb{P}} \newcommand{\E}{\mathbb{E}} \newcommand{\R}{\mathbb{R}}\]
Key Dates
- Released to Students: 2026-09-08
- Initial Submission: 2026-09-25 11:59pm ET on GitHub and Brightspace
-
Peer Feedback:
- Peer Feedback Assigned: 2026-09-28 on GitHub
- Peer Feedback Due: 2026-10-05 11:59pm ET on Brightspace
- Estimated Return of Grades and Comments:
- Initial Submission: 2026-10-02
- Meta-Review: 2026-10-11
Estimated Time to Complete: 2 Hours
Estimated Time for Peer Feedback: 1 Hour
This course will use the industry-standard code sharing platform GitHub. Mini-projects and course-projects will be submitted by posting to a relevant GitHub project and creating a world-readable HTML page. A secondary goal of this course is to help students build a web-presence and a data science portfolio, giving you a place to showcase your skills to potential employers. The four mini-projects and the final course project should form an excellent basis for a portfolio. The main aim of Mini-Project #00 is to set up the “skeleton” of this portfolio.
You may choose to complete these tasks under a pseudonym if you do not want current or potential employers, classmates, or the world at large to see your work. You will be required to disclose your pseudonym to the instructor. If you choose to use a pseudonym, it will be straightforward to add your name to any or all coursework after the semester ends. Within the course, you will have the option to switch to a pseudonym as desired, but it is difficult to fully anonymize anything once it has been posted on the public internet. With all those cautions, please take a moment to reflect as to whether you wish to proceed under your own name or using a pseudonym.
Step 0: Install git
You first need to make sure you have git installed on your computer. You may already have it, but if you don’t the following steps can make sure it is installed. To check if it is installed, open a Terminal2 and run git (Mac) or git.exe (Windows). If you get a message other than “not found”, you should be good to go.
For more detailed instructions, see Chapter 6 of the Happy Git with R book.
Windows
If you are on a Windows machine, install git using the Git for Windows bundle.
Mac
If you are on a Mac, run the following command at the Terminal:
xcode-select --install
This will prompt you to install the “XCode Command Line Tools” which include git.
Stage 1: GitHub Account Creation
To complete this course, you will need a free GitHub personal account, which you can create here. Please note that whatever account name you use will be public, so you need to define a pseudonym here if you choose to use one.
NoteGit vs GitHub
It’s important to keep git (a program) and GitHub (a website) straight in your head. git is a version control system that keeps records of different versions of your code; GitHub is just a website that plays nice with git and can be used to store copies of git data. You can use git with many other websites and tools - commercial alternatives to GitHub are BitBucket and GitLab, but you could even use Dropbox to keep copies of your git data if you really want to, but I wouldn’t recommend it.3
If you think of git as a replacement for the practice of having
Document_v1.docxDocument_v2.docxDocument_final.docxDocument_final_final.docxDocument_final_approved.docx
and instead storing these all in a single file using “Track Changes” at a super high level, GitHub is roughly SharePoint: not the software used to write files, nor the software used to track changes, but a useful site for keeping backups and sharing within an organization.
Stage 2: Course Repo Creation
Creating GitHub Repo
Now that you have created a GitHub account, log in and proceed to your dashboard at https://github.com. In the top right corner, click the + symbol and select “New Repository.”45

Create a new repository named STA9750-2026-FALL with a suitable description.
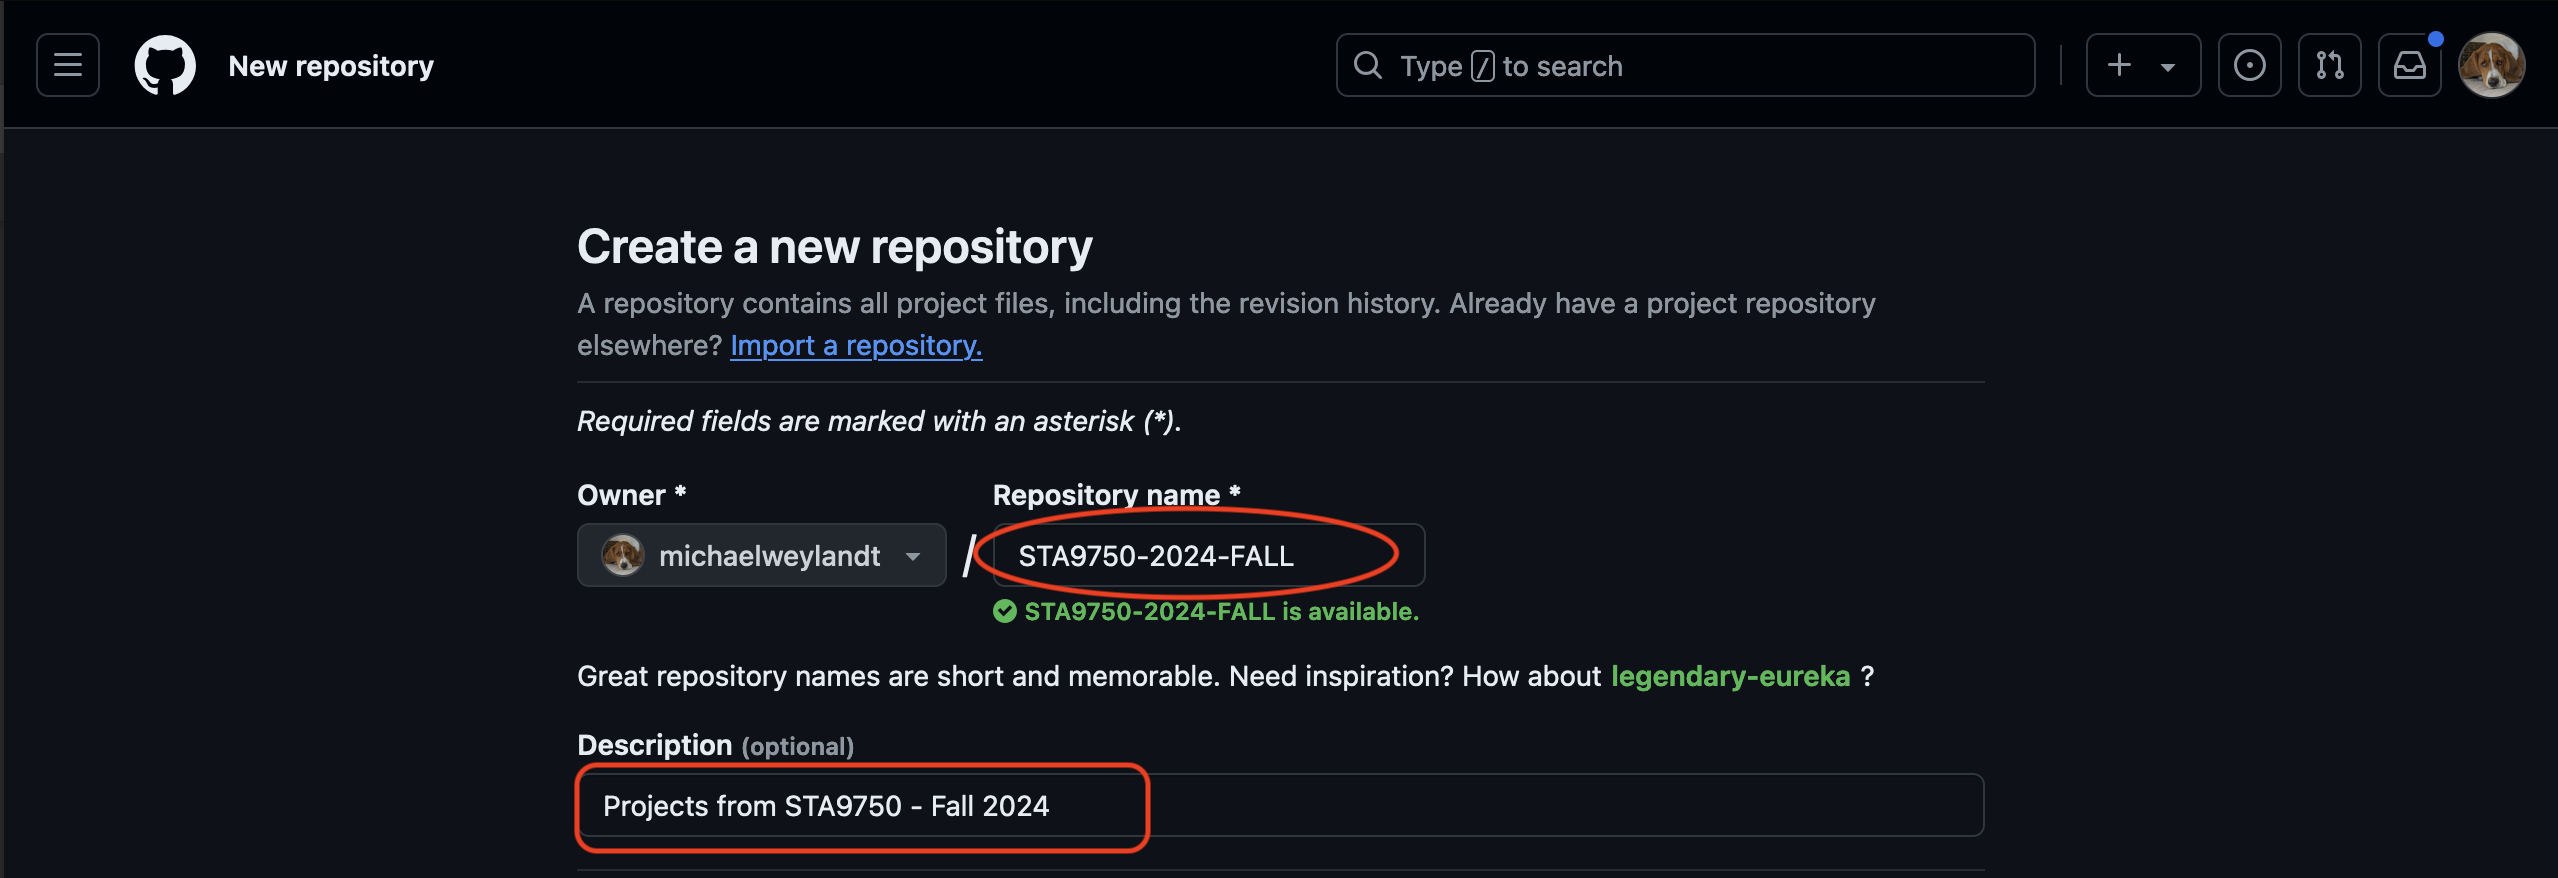
This repo needs to be public. You do not need to select a README, .gitignore, or a license at this time.
After you create your repo, you should see a page like this:
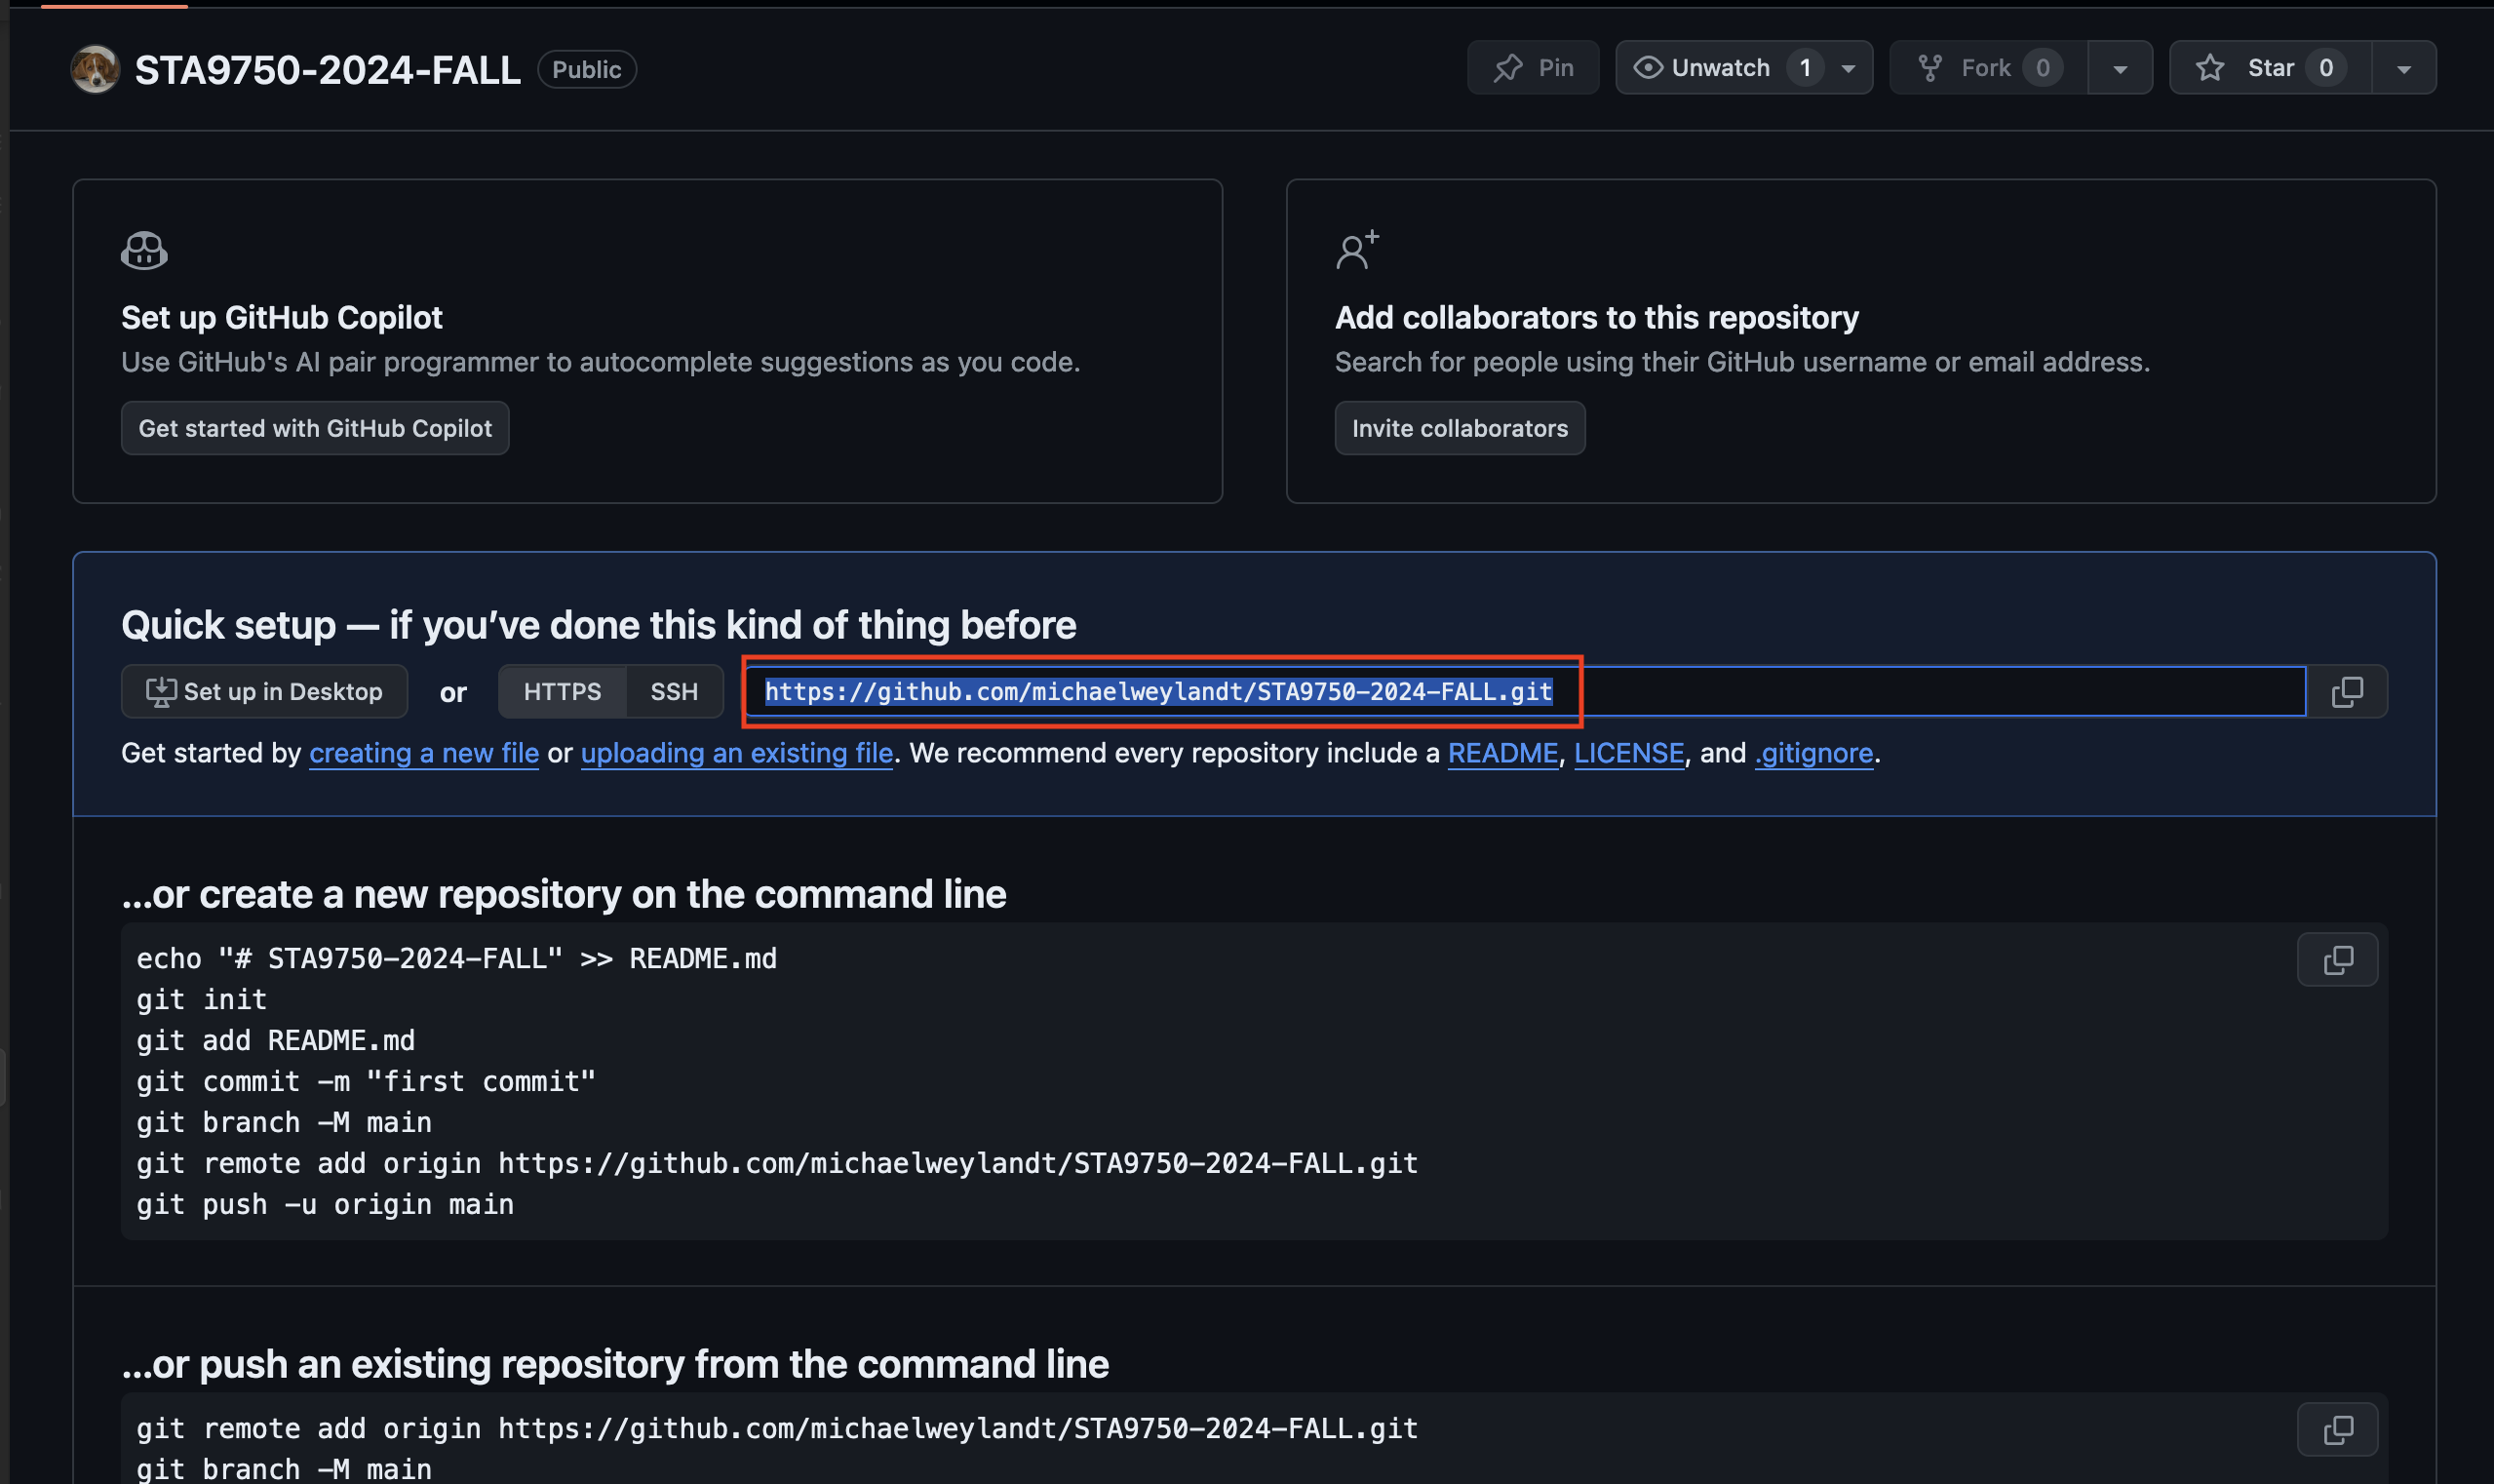
Note the URL highlighted in the main box:
https://github.com/YOUR_GITHUB_ID/STA9750-2026-FALL.git
You will need this in the next step.
Disable Issue Submission
Return to your repository home page, go to the top of the page, hit the Settings button, and scroll down to Features. Alternatively, just go to
https://github.com/YOUR_GITHUB_ID/STA9750-2026-FALL/settings#features
Once there, uncheck the checkbox for Issues to prevent accidental posting of content to your repository. All course submissions and follow-on discussion will take place in my repository at:
https://github.com/michaelweylandt/STA9750-2026-FALL/issues
Connecting GitHub Repo to RStudio
Now that you have set up an empty repo, you need to connect it to your personal machine and to RStudio. RStudio’s concept of projects roughly maps to GitHub repos and that is what we will use here.
If You Did Not Create a Project in Lab #01
Open RStudio and click the project menu in the top right corner:
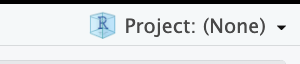
Follow through the menu to click:
- New Project
- Version Control
- Git
This will take you to the following screen:
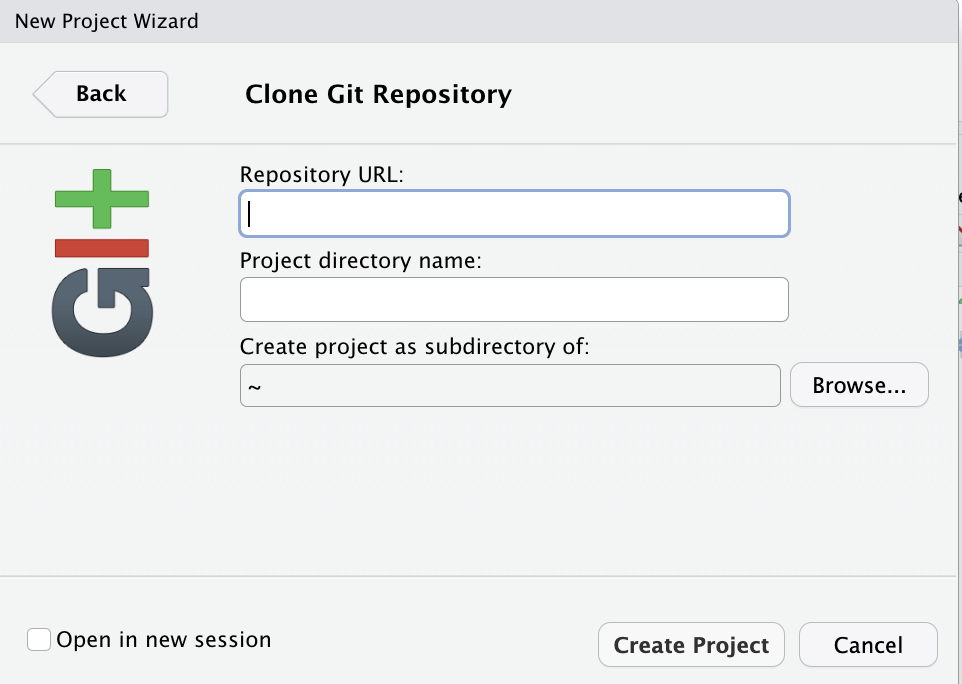
Copy the .git URL from the previous step into Repository URL.6 After doing this, the top-right pane of RStudio should have a Git tab, alongside Environment, History, etc.
If You Created a Project in Lab #01
Make sure you are in your STA9750-2026-FALL project by confirming that STA9750-2026-FALL appears in the top right corner of RStudio next to the project “box” icon. Now, go into the “Tools” >> “Project Options” menu and click on “Git/SVN”. Tell RStudio you want to use the Git version control system and enter the .git URL from the previous step when prompted. After doing this, the top-right pane of RStudio should have a Git tab, alongside Environment, History, etc.
Securing Connections to GitHub
An important aspect of source code management is access control to your code repository. While it’s typically no risk to make your code world-readable, you don’t want just anyone being able to add code to your repository. Historically, this type of access would be controlled with a username+password scheme, but GitHub has moved to a Access Token structure.
This process is a “one-time” task, documented in the Connect Section of the Happy Git with R book, but we’ll cover the highlights here.
Git Credential Manager
Before starting, you will want to make sure you have installed the Git Credential Manager (GCM). If you used the Git for Windows bundle, you already have GCM installed. If you are on a Mac, you can download the GCM installer directly or install GCM via the GitHub Desktop Client.
GitHub Personal Access Token
Next, you need to create a Personal Access Token (PAT) for GitHub.7
The easiest way to do so is to run the following R code:
Make sure you set the Expiration Date for your PAT after the end of the semester. If you need to regenerate a PAT because it expires, you can simply repeat the steps here, but setting a long-dated expiration will save a possible hiccup in the future.
Once you have created a token, copy and save it on your computer. (Note that you only be able to copy it one time, so make sure you save it somewhere memorable.) Then run the following code to register the GitHub PAT on your computer:
if(!require("gitcreds")) install.packages("gitcreds")
gitcreds::gitcreds_set()
and enter your newly created PAT when prompted.
Once you do this, your PAT will be stored in your computer’s password storage (Apple Keychain on a Mac; similar on Windows). Now that your PAT is in an “official” location, any time git needs to use it to talk to GitHub, it will know where to find it. This saves you the hassle of holding on to a PAT and retyping it constantly. Once this is all set up, you should (hopefully) never need to think about PATs again.
CautionSetting Up Tokens by Hand
If these commands don’t work, you can also perform the same steps “by hand”:
After logging in to GitHub via a web browser, visit https://github.com/settings/personal-access-tokens/new to begin the token creation process. Give the token a meaningful name and description and set an expiration date after (at least) the end of the semester.
Set the “Repository Access” to “All repositories” and, under “Permissions > Repository Permissions”, set “Contents” to “Read and Write”. This will now let anyone using your token read and write to all your repositories. After you create your token, you will be given only one opportunity to copy it. (Note that you can change permissions later, but you can only copy the token once.) Copy this and save it for later use. If you loose this token, you may need to generate a new one.
When you make your first push to GitHub (as described below), use this token as your password. If everything is set up correctly, GCM will save this token and use it to authenticate you every time you push to GitHub. You should not need to paste this token every time.
.gitignore
This course will involve many files, not all of which you will want to push to GitHub. Create a file named .gitignore and paste in the following to tell git to ignore certain files. If creating this in RStudio, create it as a “Text File”, not an “R Script”. (Also make sure to keep the leading . in the file name.)
**/.quarto/*
.Rproj.user
data/**
**/*_cache/*
*_files/*
**/*_freeze/*
**/*tsv*
**/*csv*
**/*xlsx*
**/*zip
**/*pdf
**/*json
**/*rds
.DS_Store
.Rhistory
/.quarto/*
**/gganim*
*bspf
**/*bspf
You may already have a .gitignore file created automatically for you by RStudio. If so, simply open it (by clicking the file name in the Files pane of RStudio) and add the above lines at the bottom.
This file essentially gives git instructions not to save any of the various types of output of code (PDFs, Excel files). There is a time and place for saving these files, but in this course code is truth and the output files are just an artifact of running that code. Conceptually, you can think of this as the fact that an old family secret chocolate cake is stored as a recipe (code), not by keeping a very old and moldy cake hidden in the back of the fridge.
Additional git configuration
You will, from time to time, need to send somewhat large files to GitHub, primarily high-resolution figures. Since git is primarily designed for small-ish text files (code), this can be a bit tricky, but you can increase the maximum transferrable size by running the following command at the Terminal.
git config --global http.postbuffer 524288000This only increases a limit - you might still run into problems with exceptionally large files, esp. data files if you do not set your .gitignore up properly - but it should avoid most problems.
Next, run the following at the Terminal:
git config --global init.defaultBranch mainThis will tell git to use the term “main” for your first branch. We won’t use branches in this course, but this can eliminate some issues.
git Check
At this point, run the following code to check your git setup:
if(!require("usethis")) install.packages("usethis")
usethis::git_sitrep()
This will print out a large amount of helpful information, but the important things to check are:
- Are your name and email set correctly?
- Is your GitHub user set correctly?
- Does the token have the requisite “repo” scope?
- Is the “origin” set correctly for the GitHub project?
CautionDefault branch mismatch between local repo and remote.
Certain older versions of git will use the default name master for the initial branch (though the command above should address this). If you get the message
Default branch mismatch between local repo and remote.
from git_sitrep(), proceed to make your first commit (as described below) and then run the command
git branch -m mainThis should eliminate the above issue. Note that this command needs to be run between making your first commit and pushing that first commit.
Initial Commit and Push
Now, to make sure everything is working, let’s save a basic README file and push it to GitHub. This is a plain text file with no particular structure.
To create it, click the new file button in RStudio (top left; piece of paper with a green plus) and select Text Filel RStudio will open this file in the editor. First, type some basic content, e.g.,
Submission materials for STA 9750 at Baruch College.

Owner: <YOURNAME>
(It doesn’t matter what you push: whatever you type will be the default text appearing when someone visits your repo.)
Save the file and open the Git pane in RStudio.
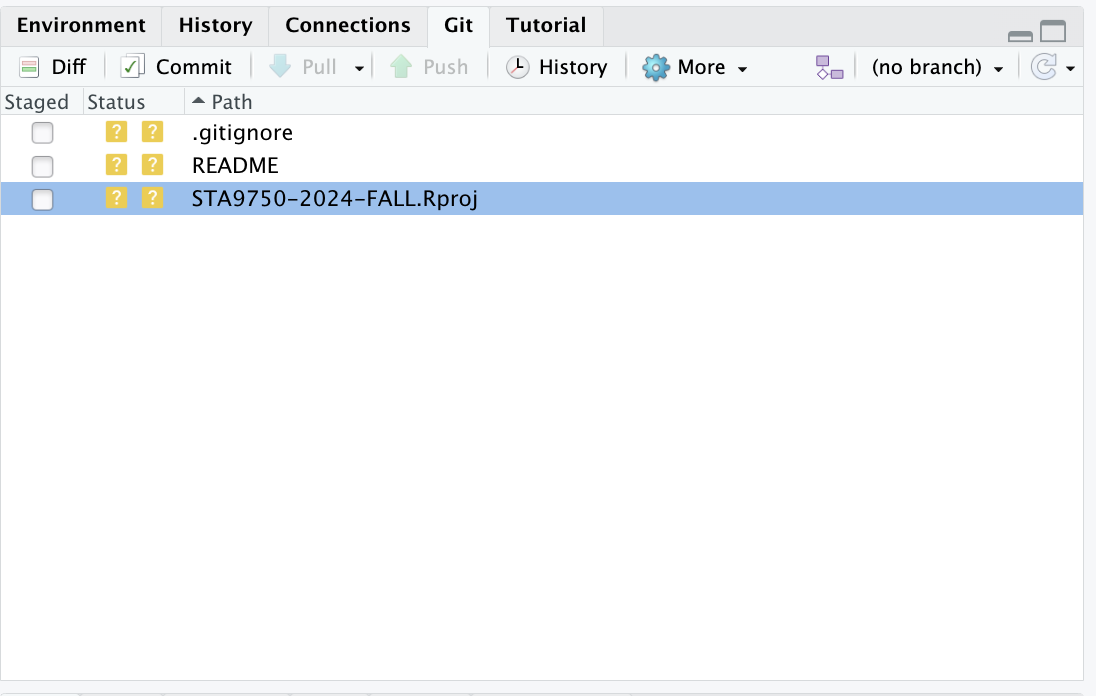
Check the box next to the README file to stage it for git.
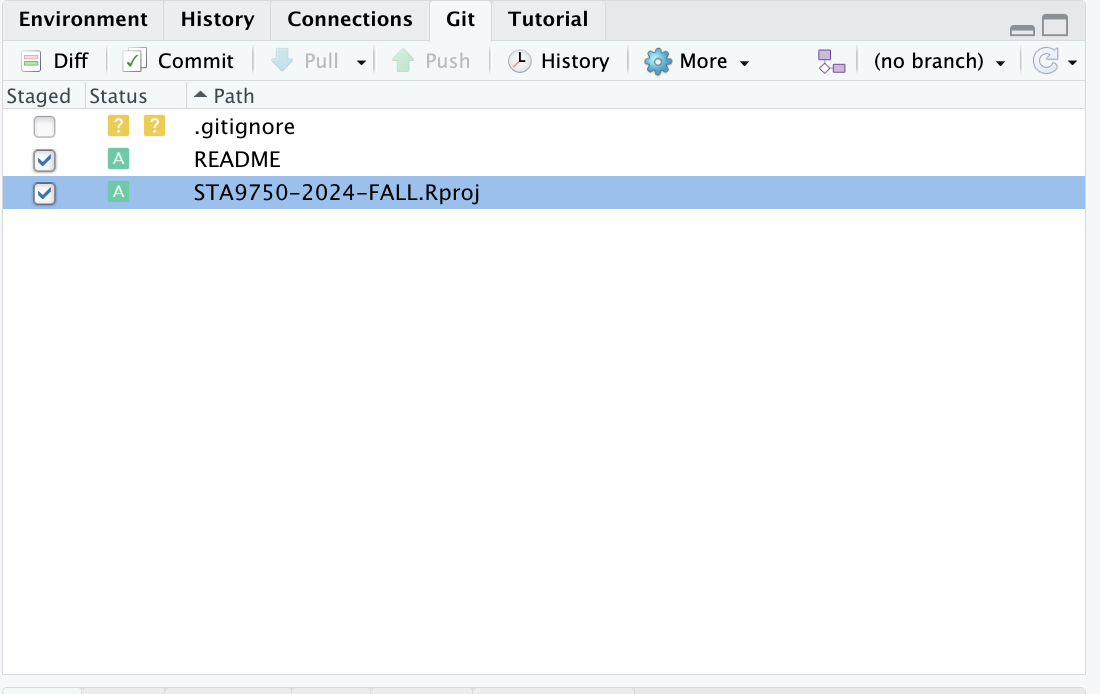
Then click the Commit button a type a brief message (Initial commit is fine). Once you have typed your message, hit the Commit button under the message box to make your first commit.
Note that you have to type something here: if you leave the box blank, it will do nothing: all commits require a message, no matter how simple.
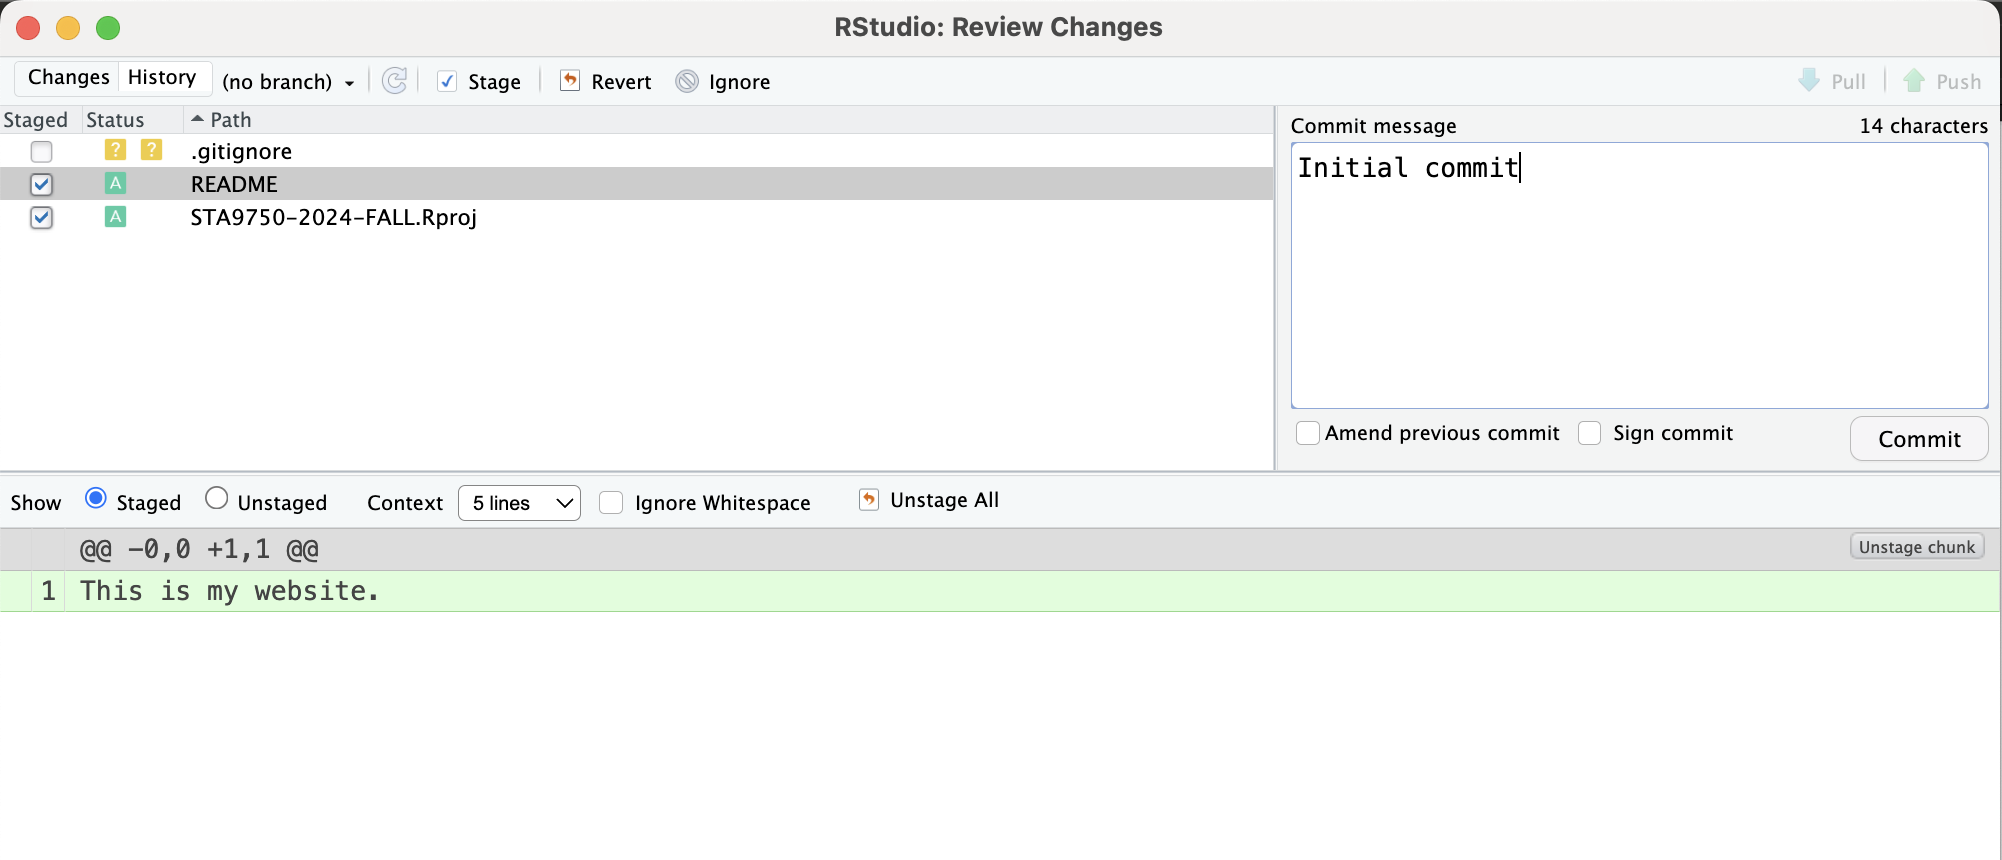
WarningTwo Separate Commit Buttons
Note that there are two separate Commit buttons you need to press. The first Commit button, which is in the “main” RStudio window in the top left portion of the Git pane next to an icon of a pice of paper with a green checkmark, brings up the Commit window. The second Commit button-in the pop-up window-is the one that actually does the act of committing.
This is sort of like when you click “Save As” in other software: you then have to actually “Save” in the secondary menu that comes up.
Finally, push the Push button. If everything works, you should see a screen like the below:
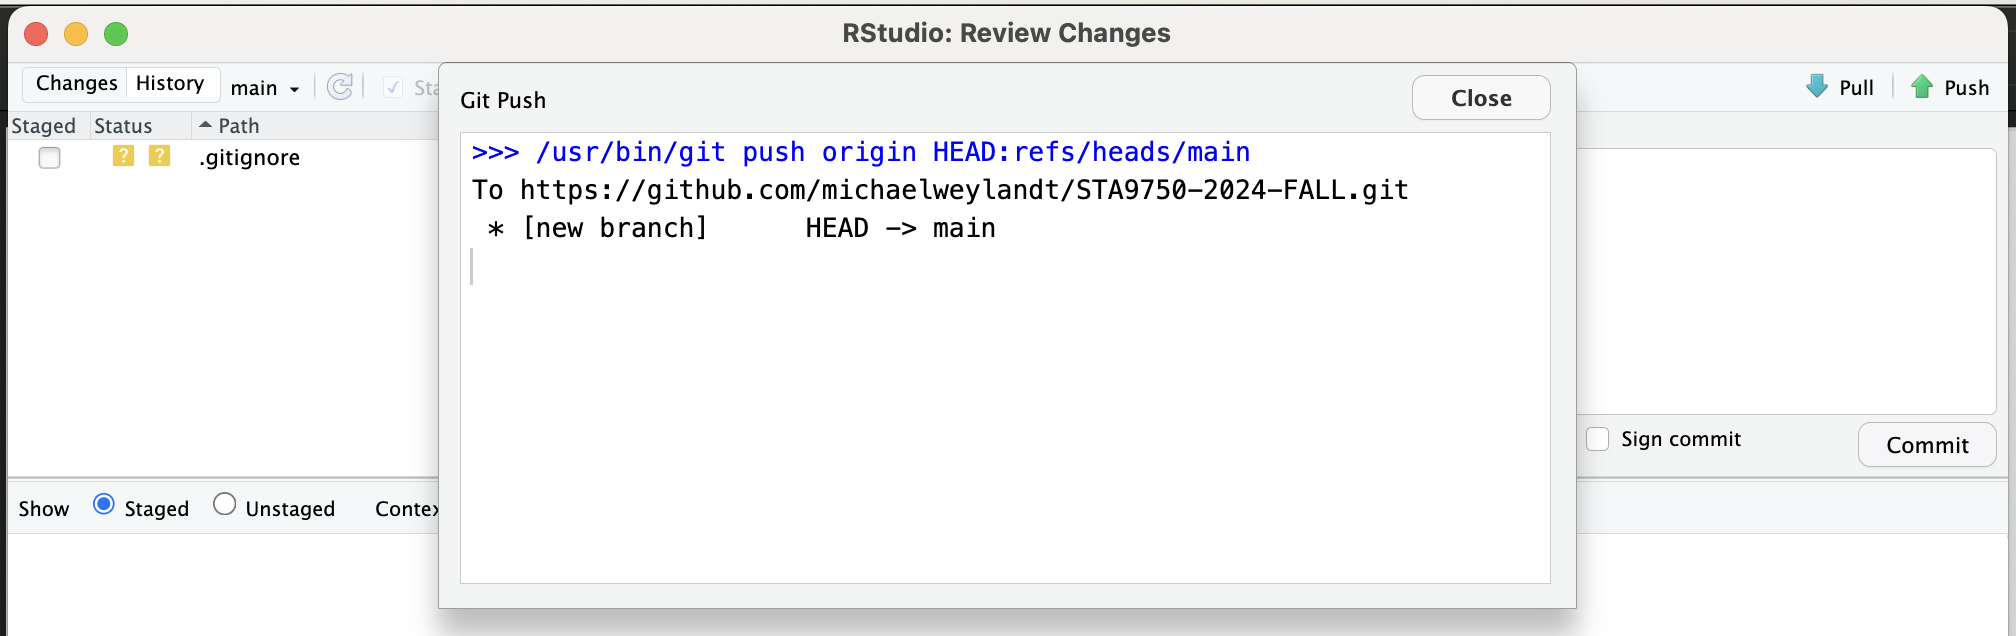
To confirm everything worked, return to the GitHub repo in your browser. You should see the text of your README file displayed at the bottom of the page.
CautionError: Cannot run
gpg
Occasionally, students will get an error message stating Cannot run gpg when trying to make their initial commit. If this happens to you, make sure you have not checked a Sign this Commit button in the Commit wizard. If that box is not checked (or does not appear), try following these instructions to make sure RStudio is set to use gpg automatically.
If you have ‘unchecked’ that box but you are still getting the gpg error, it is likely that something in your git settings is requiring gpg. I don’t know why this happens to some students, but it’s an easy fix: go to the Terminal tab in RStudio (not the same as the Console!) and run the following commands:
git config commit.gpgsign false
git config --global commit.gpgsign false
These will turn of the default use of gpg in git.
Taken together these two steps seem to be sufficient for making sure gpg is never invoked by git or RStudio.
gpg is a powerful privacy and identity verification software that can be used to prove that you are the actual author of your git commits. If you have used it elsewhere and want to use it in this course, that’s fine, but it is certainly not required.
Stage 3: Personal Website Creation
Now that you created a place where you can push files to GitHub and have successfully pushed a basic README, it’s time to build a webpage using quarto.
We will need three pages to build a website:
- A configuration file,
_quarto.yml, used to specify the look and layout of your website. - An
index.qmdfile used to create the homepage. - A build script to create the website.
Configuration File
Open a new text file and save it as _quarto.yml. This is a configuration file used by quarto to control the layout of your site. For a bare-bones site, copy the following into _quarto.yml:
project:
  type: website
  output-dir: docs

website:
  title: "STA 9750 Submission Material"
  description:
    Course Projects for STA 9750 at Baruch College
  site-url: "https://YOUR_GITHUB_ID.github.io/STA9750-2026-FALL/"
  navbar:
    background: primary
    search: false

format:
  html:
    theme: THEME
    toc: false

editor:
  mode: source
Note that the indentation pattern is important so copy this exactly.
Replace YOUR_GITHUB_ID with your GitHub user name.
For THEME, visit the Bootswatch theme gallery and pick your preferred theme. Replace THEME with a lower case version of the theme name; if you want to use the Sandstone theme used for this course website, THEME will be sandstone (NB: lower case). See, e.g., the _quarto.yml used for this course.
Once you have created this _quarto.yml, stage it (click the check mark) in RStudio’s git pane.
index.qmd
Next, we’ll build your home page, conventionally called index.html. We will not write the HTML code by hand - it’s quite cumbersome - and will instead let quarto create it for us. Create another plain text file and save it as index.qmd.8
This file will be divided into two parts, a header giving the metadata for the site, and a body, giving the content of the site.
First write the header, separated by three horizontal bars (minus signs) above and below. For now, all you need to specify is a title:
---
title: "YOUR TITLE GOES HERE"
---
Below the header, write the basic content of your website: a brief introduction of who you are.9 You can use markdown here for formatting. Basic text will suffice, but this is also a great opportunity to include things like a personal headshot, a link to a full resume, or similar.
As you work on this, click the “Render” button at the top of the editor pane to see what your site will look like.
Additional Set-Up - Rendered Code
In order to make sure that your R and quarto environment has been properly configured, it is necessary to include to include a bit of R code in your submission. At this point in the course, you are not required to write any R code of your own, so I’ve written some options here. Pick one to include in your submission - or modify them to do something else fun. If there’s something else you’d like to include, reach out to the instructor and I might be able to help you put something together.
Once you are happy with this landing page and have included on of these dynamic components (or similar), stage it and we’ll move on to building the website properly.
Last Updated
The following code will add a “Last Updated:” footer at the bottom of your page.
```{r}
#| include: false
1+1
```
--------------
Last Updated: `r format(Sys.time(), "%A %m %d, %Y at %H:%M%p")`
Warning
Note that the 1+1 block will not actually be printed because of the #| include: false flag, but it is necessary to force quarto to execute inline code blocks. Alternatively, you can add engine: knitr to the document header (where the title is specified). See Discussion at Github or the Engine Binding documentation.
Baruch Map
The following adds a map with the location of Baruch College. You can change the GPS coordinates and text to another place of relevance to you.
```{r}
#| echo: false
#| message: false
#| warning: false

if(!require("leaflet")){
    options(repos=c(CRAN="https://cloud.r-project.org"))
    install.packages("leaflet")
    stopifnot(require("leaflet"))
}

baruch_longitude <- -73.98333
baruch_latitude  <- +40.74028

leaflet() |>
  addTiles() |>
  setView(baruch_longitude, baruch_latitude, zoom=17) |>
  addPopups(baruch_longitude, baruch_latitude,
            "I am a Master's student at <b>Baruch College</b>!")
```
Resume Hosting
While you can put the contents of your resume directly into your qmd file, it’s common to maintain your resume as a stand-alone PDF. You can host this file within your course site and link to it directly from your index.qmd.
I recommend coming back to this and doing it as a ‘second-pass’ after you have the main functionality of your site working.
The steps are quite simple:
-
Put a copy of your resume in your
STA9750-2026-FALLdirectory. This should go into the top level (main folder), not thedocssubfolder. (If you look at theFilestab inRStudio, you should seeindex.qmdand your resume in the same directory.)As with all files, I strongly recommend you have an all lower-case no-spaces name. So
resume_public_2026.pdfis good, whileResume Public (2026).pdfmight cause you problems down the road. -
Link to your resume from your
index.qmdfile. E.g., if your resume were saved in a file calledresume_public_2026.pdf, you could include a link that looks like:Click [here](./resume_public_2026.pdf) to view my resume.The
./prefix isn’t strictly necessary, but it’s useful.Note that you need to include the suffix (
.pdf), not just theresume_public_2026part. -
Render your
index.qmdas normal.When you render the file, Quarto will see the linked
pdfand “process” it as well. Because there’s nothing to do with the file (it’s already a PDF), Quarto will just copy it into thedocsfolder.10Hopefully, when the preview comes up, you will be able to click the link and see your resume.
-
Finally, you need to make sure
gitwill track thispdffile. Since PDFs are typically output in this class, we toldgitto ignore them in the.gitignorefile you created earlier. Here we have to make an exception.Go into the
Terminal(notConsole) in RStudio and run the commandgit add -f your_resume_name.pdf docs/your_resume_name.pdfsubstituting
your_resume_name.pdfboth times for the actual file name.This will tell
gitto ignore our prior instructions and to track this PDF. (It will still ignore others by default.)Now create a
git commitas before that captures the update. (Check theindex.qmd,docs/index.htmlboxes and other related files in RStudio; make a commit using theCommitmodal (pop-up) window.)
Now, the next time you push your content to GitHub, the resume file will be included in the update.
Other files you might want to include, e.g., a headshot, will follow the same process.
Build Your Site Locally
Once you have filled out your index.qmd file, it’s time to see what it looks like. Hit the Render button in RStudio, located in the bar just above the file contents, and a new window should pop up with your rendered content.
This is the point where you will get strange error messages if you haven’t done the earlier parts correctly. Things to check:
-
If you’re not getting a website formatted with your chosen theme and title, make sure you’ve created your
_quarto.ymlfile in the root directory (theSTA9750-2026-FALLfolder) of your project. To check this, if you look at theFilestab (bottom right of RStudio), you should see both_quarto.ymlandindex.qmdlisted in the same directory.Common mistake: omitting the leading
_in_quarto.yml
For more help, please reach out on the Course Discussion Board.
Iterate to Perfection
Once you have the Render button working, continue to iterate and improve your homepage until you’re ready to send it out into the world.
Stage 4: Getting Content to GitHub
Now that you like the way your site looks on your computer, we need to put it somewhere where anyone (specifically, me and your classmates) will be able to see it. For security reasons, it’s a very bad idea to let the whole internet access your personal computer directly at any time, so we will instead use a hosting service that holds these files out in a ‘world-visible’ location. In this course, our hosting service is GitHub and we will specifically be uploading your files into your STA9750-2026-FALL repository that you created above.
Conceptually, you already did this with your README file, but uploading a whole site is a bit trickier as it consists of many files and repeating that process manually for each file is a bit cumbersome. Specifically, we want to make sure that everything in the docs folder gets uploaded as they are all used to make your site look good.11
Recall that our first step is staging a file (or adding it to the staging area), which tells Git to get ready to save that file. Earlier, you did this by ‘checking a box’ next to the name of the file you wanted to stage. (Unstaged files appearing with a yellow question box in RStudio’s Git tab.) You can do this manually for all the files you want to upload here (index.qmd and everything in docs), but an easier thing to do is to just tell git to stage everything in one-go by running the command
git add index.qmd docs/*
at the Terminal (not Console). This will stage everything. Hopefully, RStudio will immediately show you all of the files that are now staged, but you might need to press the refresh button (“circle arrow”) appearing towards the right of the Git pane. (If you don’t see this, make your pane a bit wider.)
After this, make a Commit and push as before. Once you push, you should be able to see your files on GitHub by going to
https://github.com/YOUR_GITHUB_NAME/STA9750-2026-FALL
and clicking around. If your files (index.qmd and the docs folder) are not visible you have not successfully pushed to GitHub. Return to RStudio and try again.
If this all works and your files are on GitHub, you should be able to see your site by going to
https://htmlpreview.github.io/?https://github.com/YOUR_GITHUB_NAME/STA9750-2026-FALL/blob/main/docs/index.html
If this looks good, move on to the next step. If this has the basic text, but some of the formatting is wrong or missing, you probably didn’t get everything in the docs folder. Return to RStudio and try again. Recall, commits are free, so it doesn’t hurt to make as many as you need until you get things working.
NB: This htmlpreview engine does not have full support for interactive elements (like the Baruch map example). If your site looks good except for a missing interactive component, you can still move on past this step. Just make sure to check how your site looks on the real web server (GitHub pages) after you activate it in the next step.
NoteQuick Review of Sending a File to GitHub
As a brief reminder, there’s a three step process to get your content (both source files and rendered html) to GitHub.
-
You need to declare your intent to save a file - this is variously called ‘adding’ or ‘staging’ that changes to that file. (Git works by tracking changes and you can make edits to only part of a file, but for this class, it’s fine to think on a while file basis.) In RStudio, you do this by clicking the little ‘check box’ next to the file in the
Gittab or by using thebuild_sitescript above.At this point, you’ll want to stage basically everything you have so far, most importantly;
1) the `_quarto.yml` file;
2) the `index.qmd` file; and
3) all the contents of the `docs` folder. (This is the output of
   rendering `index.qmd` following the configuration in `_quarto.yml`)
There’s more in that
docsfolder than you might think (lots of layout, color palette, formatting files), but when you ‘check’ it, you’ll see the folder expand and all of its contents will be checked automatically. -
You need to actually ‘follow-through’ on the saving. (In the previous step, you declared “I will save this” and now you actually need to follow through). This saved version in Git-speak is called a
commit, so the verb for saving it committing.To commit your changes, hit the “Commit” button in the top left the
Gitpane inRStudio. This will pull up a pop-up window (a “modal”) where you can see the changes that are about to be saved. If they look good (and they usually will), type a message in the text box in the top right of the modal and hit the “Commit” button there. (Again, note that there are two different “Commit” buttons that need to be pressed to actually make the commit.)You will get a little message box that will probably say something like
create mode 100644 FILENAMEThis is a bit technical, but it’s just
gitacknowledging that it has a new file to keep track of. At this point you can close the modal window.If your commit succeeded, you’ll now see a thin message bar in the
Gitpane ofRStudiothat says something like “Your branch is ahead of origin/main by 1 commit.” This isGittelling you that there is one commit, i.e., one saved version, on your local machine that has not yet been sent to GitHub.After you make your commit, the list of files in the
Gitpane will become much shorter. Recall thatgittracks unsaved changes, so since you just saved those files, they will disappear from that listing. If you make more changes to those files later, the file names will re-appear (since there are new unsaved changes) -
Push the newest version to GitHub. If everything is set up properly, just hit the
Pushbutton and your latest commit will be sent to GitHub. If this works, the “one commit ahead” message will go away since GitHub is now up-to-date with your local machine.After you have your GitHub pages server set up (next step below), your website will automatically update after each successful push.
Stage 5: GitHub Pages Deployment
After the previous step, your content is hosted on GitHub, but not (easily) visible to the world. In particular, that URL you used as a quick test was a bit cumbersome. To make things easily ‘world-visible’, you need a proper web-server, that is, a computer to which anyone can connect and with the sole purpose of distributing your site to anyone who wants to view it. (We will talk more about servers later in this course.)
Web servers can be quite expensive to run - especially for popular sites that get a lot of traffic - but our site is simple12 and low-volume, so GitHub provides a free server, called GitHub Pages, that we will use.
Activate GitHub Pages Server
Using your web browser, return to the GitHub repo you created; recall that the URL is something like:
https://github.com/YOUR_GITHUB_ID/STA9750-2026-FALL/
Open the “Settings” menu at the top of the page and proceed to the “Pages” submenu. You should see a page that looks like this:
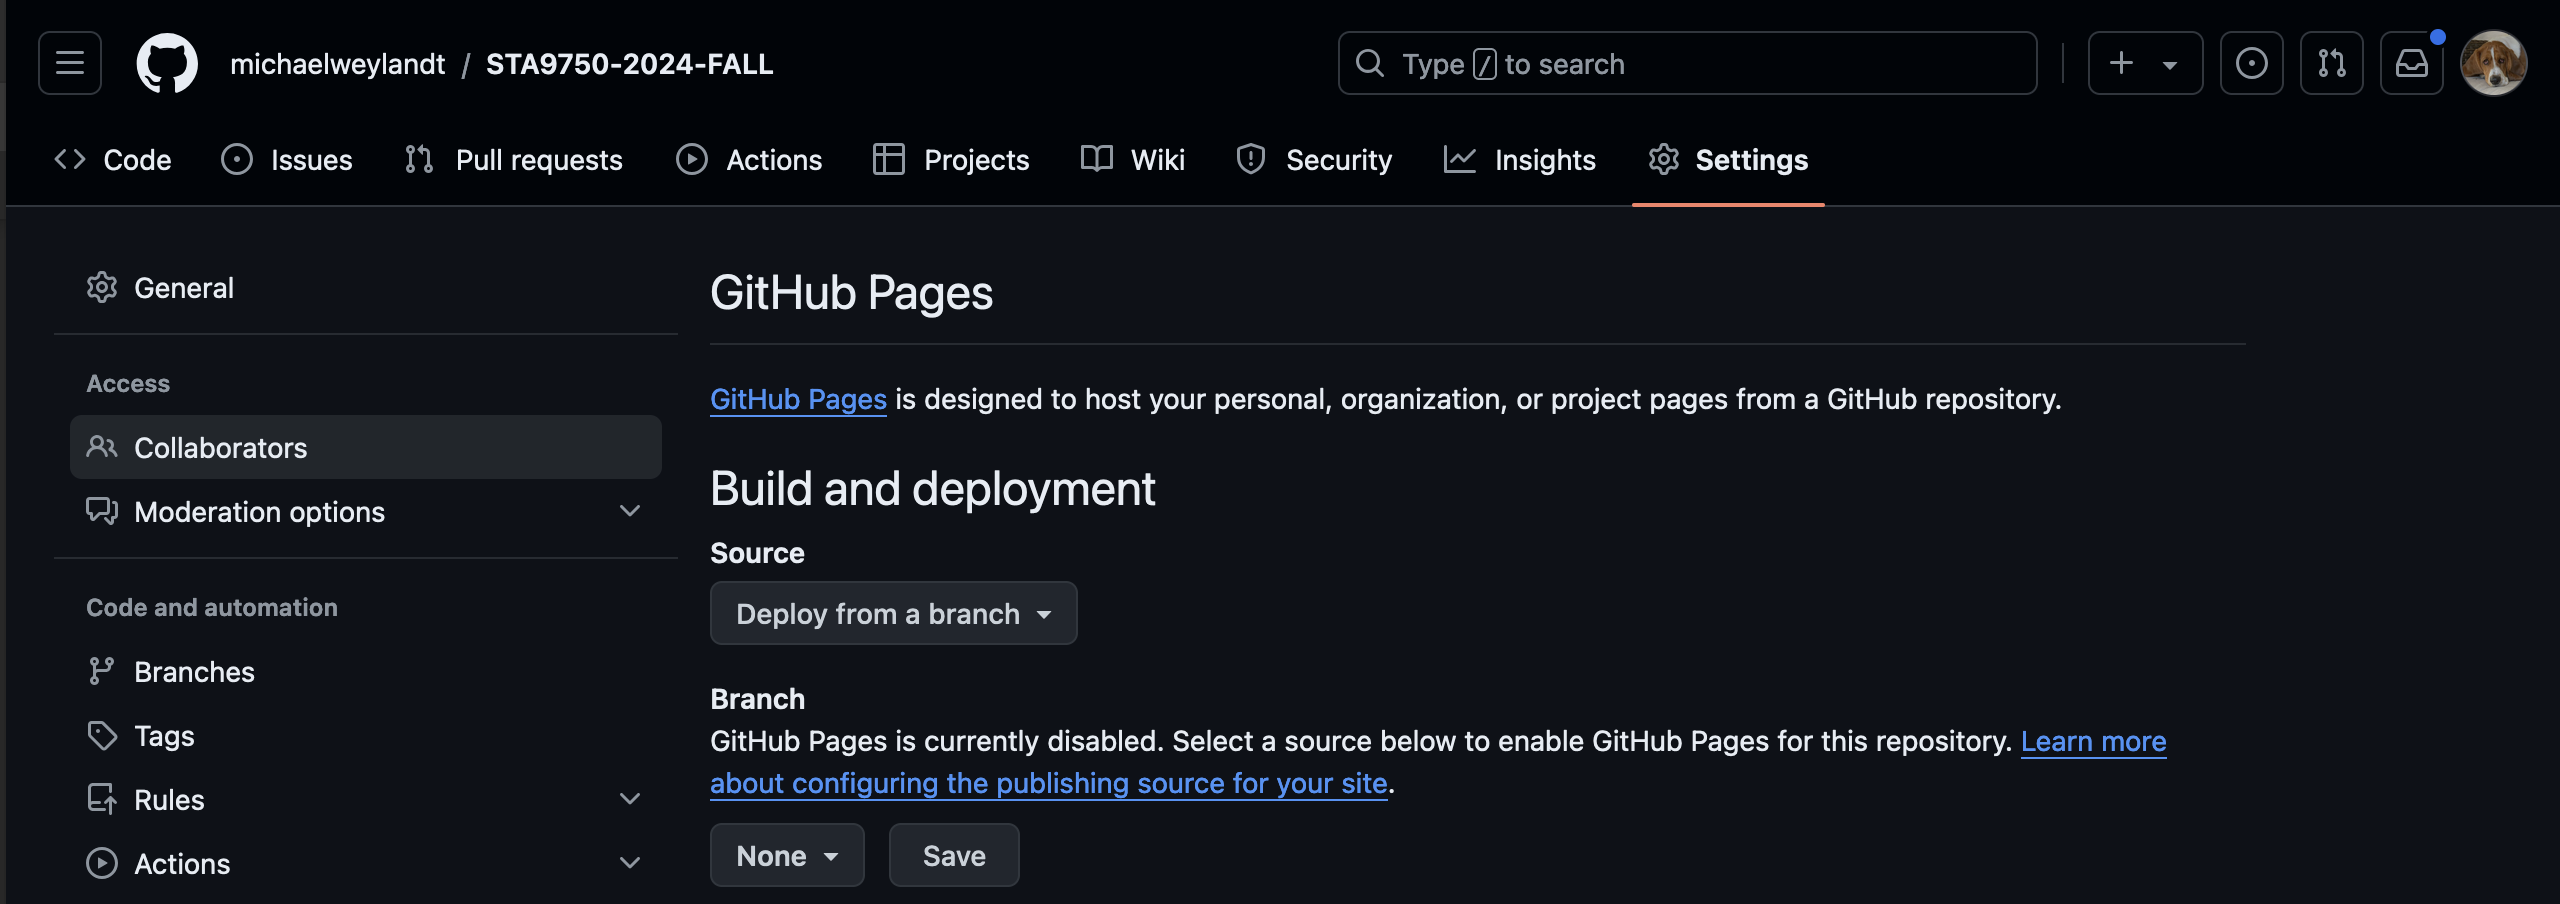
Alternatively, you can go directly to this page by visiting:
https://github.com/YOUR_GITHUB_ID/STA9750-2026-FALL/settings/pages
Under Build and Deployment, set the main branch to deploy and select the docs directory on that branch. Hit save and your website will go live!
To check your website is working, proceed to
https://YOUR_GITHUB_ID.github.io/STA9750-2026-FALL
If everything works, you will see your site! (If you used the Render feature in RStudio, it should look familiar.)
If you get stuck, use the course discussion board to seek help from your classmates and, if necessary, the instructor.
NoteGitHub Job Failed
The GitHub Pages Deplay job – the steps run to update your website – almost always complete without issue. If they do not succeed, you will typically get an automated email from GitHub informing you that the job failed.
The most common cause of failure is running GitHub pages without a docs folder. If the error email (or possibly the text it links to), ends with something like:
No such file or directory @ dir_chdir0 - /github/workspace/docs
You have not uploaded the docs folder to GitHub properly. Return to an early step to fix this, push a new commit, and the problem should resolve automatically as soon as a docs folder (with contents) is uploaded.
Stage 6: Create Placeholders for Future Mini-Projects
Return to RStudio and run the following commands at the R Console:
for(n in 1:4) {
  fname <- sprintf("mp0%g.qmd", n)
  if(file.exists(fname)) stop(fname, "found. Please contact instructor for advice.")
  writeLines(sprintf('---
title: "Mini-Project Placeholder"
---

This is a placeholder for STA9750 Mini-Project %g. Check back soon for more!', n), fname)
  quarto::quarto_render(fname)
}
This will create files mp01.qmd, mp02.qmd, mp03.qmd, and mp04.qmd with a basic placeholder and render them all.
Go through the same git cycle as before and make sure you can view them on GitHub. (Make sure that you include them all in a git commit and a git push; we want to make sure that all of the pages are visible through your site, even if they are just placeholders for now. In general, you want to make sure everything in the docs folder makes its way to GitHub.) If everything works, they should have the same ‘look’ and feel as your homepage and should be visible at:
https://YOUR_GITHUB_NAME.github.io/STA9750-2026-FALL/mp01.html
You don’t need to do anything with these now, but it’s good to set these ‘shells’ up to make sure everything is good to go for later projects.
Stage 7: Submission
After your site is live and you’ve confirmed all five pages (homepage plus four mini-project shells) are visible, you will submit it to the instructor in three steps:
- Log into the course discussion board (Teams) and send me your GitHub name so I can link it to my gradebook. There is an “Assignment” in Teams that should allow this.
- Tag
@michaelweylandton GitHub to make sure I can access your repo. - Submit a PDF copy of your assignment through Brightspace.
All three steps must be completed to complete the assignment.
Discussion Board (MS Teams)
First, send me a private message through the course discussion board with the following details:
- Real Name
- CUNY EmplID (8 digit ID code)
- CUNY Email13
- GitHub user name
- The section you are enrolled in (Tuesday or Thursday)
This is the only place where you are required to connect your GitHub ID with your real name and CUNY credentials. I need this information to connect your public activity with my (private) gradebook and the CUNY system. When I receive this information and enter it into the course back-end, I will provide you a private passcode. This passcode will be used to submit anonymous peer feedback, so please note it and save it for later use.
Instructor Tagging
Next, you’re going to contact me through GitHub: go to14
https://github.com/michaelweylandt/STA9750-2026-FALL/issues/new
to open a new issue. Title the issue STA 9750 YOUR_GITHUB_ID MiniProject #00 and fill in the following text for the issue:
Hi @michaelweylandt!

I've created my STA 9750 website - check it out!

https://YOUR_GITHUB_ID.github.io/STA9750-2026-FALL/
(Replace YOUR_GITHUB_ID with your username throughout.)
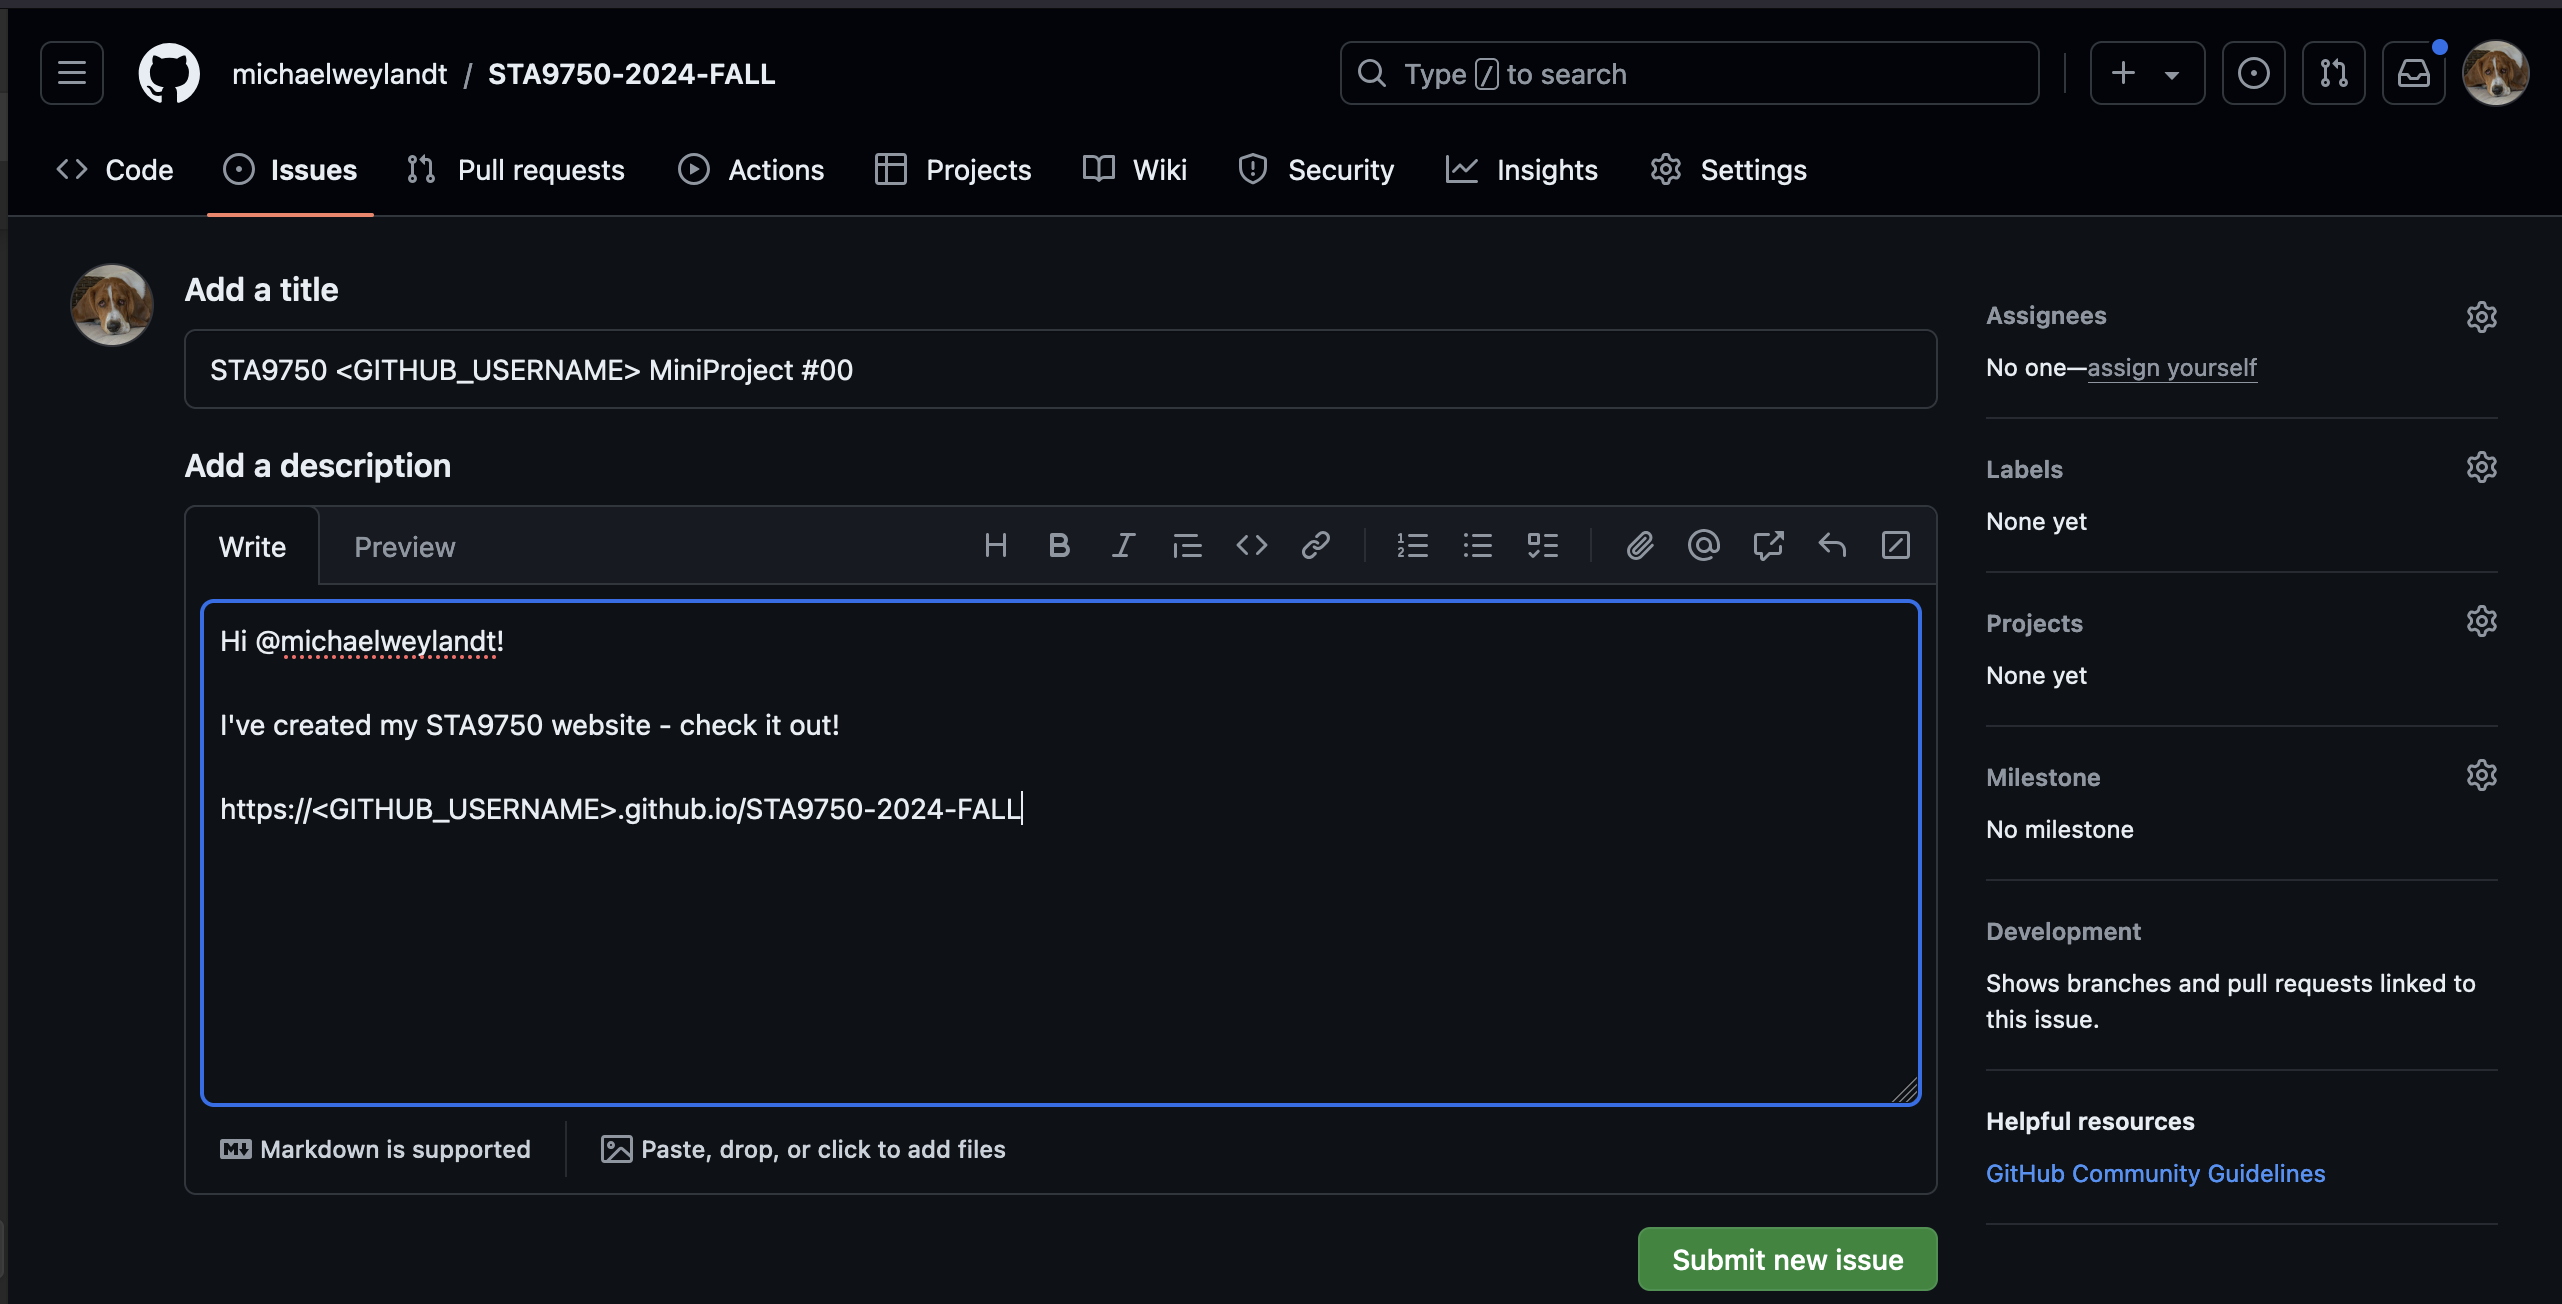
This will send me a notification through GitHub and I will confirm that I can access your repository and website. You should also use the course helper scripts to verify you have opened a GitHub issue properly. For this project, simply run:
source("https://michael-weylandt.com/STA9750/load_helpers.R")
mp_submission_verify(0, "YOUR_GITHUB_ID")
If you don’t do this, I may not be able to access your graded assignments when you submit them!
Brightspace Submission
Finally, a PDF export of your home page should be submitted on Brightspace. To create a PDF from the GitHub-hosted page, simply use your browser’s ‘Print to PDF’ functionality and upload the resulting file to Brightspace.
Wrap-Up
Once I acknowledge receipt of your ID and website, you’re done with Mini-Project #00! You’ve built a website and are ready for the course to begin in earnest.
Mini-Projects #01-#04 will be submitted as separate pages in your website (different quarto documents) and hosted via GitHub pages for peer feedback. We will discuss that process in more detail after Mini-Project #00 is complete.
Optional: Adding a Personal Image to your Site
Often, students will want to add a personal picture or professional headshot to their page. This is a two is a two part process:
-
Your picture needs to be somewhere public. If the picture just lives on your personal computer, website viewers won’t be able to access it. (For very good and hopefully obvious safety reasons, you don’t want everyone on the entire internet to have access to your files.)
There are two public places it makes sense to host an image file:
You can place a copy of the picture in your GitHub repo, just like the docs/index.html file. This is recommended as it gives you total control over the image and lets you update or replace it easily. Alternatively,
You can link to a picture hosted elsewhere.
For option a), place a copy of the image file in the root directory of your site (
STA9750-2026-FALL). When you render your site, a copy should be automatically created under thedocs/. E.g., if you haveheadshot.pngin the top level directory and used in your site, you should seedocs/headshot.pngcreated automatically byquartowhen you re-renderindex.qmd. Once it is in thedocs, just run it through the normalgitsteps (add,commit,push) and a copy will appear on GitHub. Note that it is important that a copy exist underdocs: only files in thedocsfolder are actually accessible to the broad internet.If, for whatever reason,
docs/headshot.pngis not automatically created, just manually copy the image into thedocsfolder.For option b), you just need the URL of where the image is hosted. You can usually get this by righ-clicking on the image and selecting “Open in a new Tab”. The URL of the resulting tab will be what you want. Other sites, particularly those optimized for hosting content (like a Flickr or Imgur) will give you a specific “embedding URL” to use instead. While this option can be useful, some sites, e.g., LinkedIn, do not allow you to embed images from their servers even if you were the one to originally upload it. If this is the case, simply save a copy locally and go through option a) instead.
-
Once your image is public, you need to link to it. This is done with Markdown’s
syntax. (Note the leading!- it’s important.)For an image hosted externally (option b), just put the full URL into the URL slot. This needs to be everything from
httpall the way to the end.For an image hosted on your GitHub, you can use what’s called a relative link. If the image is in the right place, this is as simple as just using
headshot.pngfor the URL, so the entire snippet to include isFor more complex sites, you might want to store all your images in a folder and link to that folder, but that’s a bit more advanced and we’ll cover that sort of thing later in the course.After you’ve put in the link, hit Render to make sure it works and then do the
git add,commit,pushcycle. If the image works on your local computer but doesn’t appear on the hosted website and you instead get a missing image icon, be sure to check that you have a copy of the image in yourdocsfolder on GitHub.
Hints
If you need help, the course discussion board should be your first stop.
If you want to personalize your website further, you can see how I have created mine on GitHub. Recall that the Markdown syntax used by quarto is summarized at https://www.markdownguide.org/basic-syntax/.
You may want to use the About Page functionality to improve the look of your home page. This gives you the ability to link to your social media (personal and professional) or personal blog, to include a professional headshot, etc.
This work ©2026 by Michael Weylandt is licensed under a Creative Commons BY-NC-SA 4.0 license. 
Footnotes
Early in the course, I will ‘scaffold’ most of the analysis, leaving only some small steps for you to fill in. As the course progresses, the mini-projects will be more self-directed.↩︎
It is important to pay attention to the distinction between the “Console”, where you run
Rcode, and the “Terminal”, where you interact directly with your computer’s operating system (OS). Both of these can be accessed from within RStudio, by clicking either the “Console” or “Terminal” tab in the bottom left corner. If you get messages about syntax errors for code that seems correct, this is often worth checking as its easy to get the two interfaces confused.↩︎git’s history won’t play nicely with Dropbox’s version history. Trying to keep agitrepo inside aDropboxfolder is generally a bad idea.↩︎Alternatively, simply go to https://github.com/new after logging in.↩︎
Note that these images are taken from a previous offering of this course. Update to the current semester as appropriate.↩︎
You can leave the next two boxes blank or set a custom directory name and location. RStudio’s defaults are reasonable; the default directory name will simply be
STA9750-2026-FALLand it will be located in your home directory.↩︎A Personal Access Token (PAT) is a sort of “specialty” password that you can use to connect a specific computer to a specific service for a limited time period with limited permissions. Like any password, your PAT should not be shared with anyone else.↩︎
Make sure to store this - and indeed all files - in this course with an all lower-case file name. Computers are sensitive to file capitalization in ways that can be quite confusing. If you are “all lower-case, all the time”, you will avoid many of these issues.↩︎
If you choose to complete the course using a pseudonym, make up something fun. If you are using your real name, this is a great place to state that you are a Baruch student, your expected graduation date, your field of employment (current or desired), and one or two personal facts. This, along with a LinkedIn page, will quickly become one of the first things that comes up when a potential employer searches your name, so make a good impression!↩︎
Remember, only those files in the
docsfolder will be actually part of your website, but you don’t want to mess with them directly and should let Quarto manage that folder. Hence, we let Quarto “process” (copy) the file fromresume_public_2026.pdf(input) todocs/resume_public_2026.pdf(output).↩︎You won’t interact directly with most of the folders in
docs, but there will be a file in there for every page, for every color scheme, for every form of dynamic behavior (like drop downs or search bars), for every image, for the font you use, etc. Even a simple site can have several hundred files.↩︎GitHub Pages can only be used to serve static websites. That is, websites that are ‘just’ a page (or a single page) with no meaningful server-side activity. So no passwords, no accounts, no ‘saving data for later’, but perfectly fine for document distribution.↩︎
Please send me a CUNY email - typically an
@login.cuny.eduor@stu-mail.CAMPUS.cuny.eduemail. Under FERPA, the federal law about student privacy, it is better for me to email all course info to CUNY emails to avoid accidentally sharing personal grading info to third parties, e.g. Google if you use a@gmailaccount. You can however use any email you want for your GitHub account.↩︎Throughout this course, make sure to replace
YOUR_GITHUB_IDwith your recently created GitHub ID. Note that the automated course infrastructure will be looking for precise formatting, so follow these instructions closely.↩︎